Pardeep
๑۩۩๑┼●ℛŐŶ
James Bond Intro Gun Barrel (A Photoshop Tutorial)
I am very sure that most of you (if not all) are very familiar with James Bond films. This tutorial will guide you through the basic steps in creating the gun barrel thing that you see in the introduction of James Bond films. Take note, I said “basic”. I’ll leave it all up to you to add effects to this to make it more realistic-looking if it’s that you desire.
I was right with what I said in my “Camera iris diaphragm tutorial” that it can be modified to create this kind of effect. (smile)
Have fun!
Step 1
Create a new 72 dpi-document sized 1024 pixels wide by 768 pixels tall

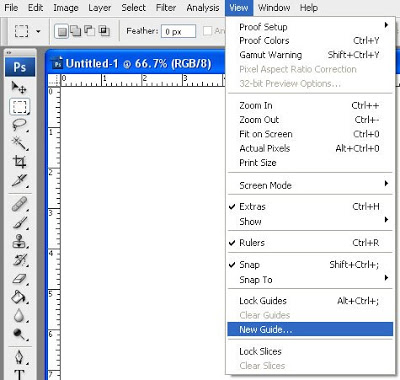
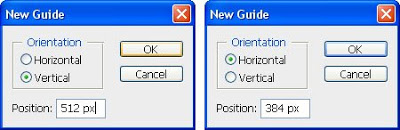
Step 2
Put a vertical guide at 512 pixels and a horizontal guide at 384 pixels. To do this, go to the “View” menu and click on “New guide” (you have to do this twice, one for the vertical guide and one for the horizontal guide). This should create guides that intersect at the exact center of your canvas.

Step 3
Make sure you’ve got “Snap To Guides” turned on. If you haven’t, go to the “View” menu, then “Snap To” and click on “Guides”.
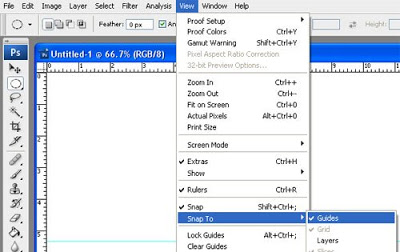
(Note: A check mark beside “Guides” indicates that you already have “Snap To Guides” turned on.)
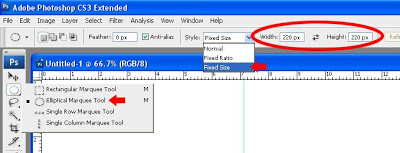
Step 4
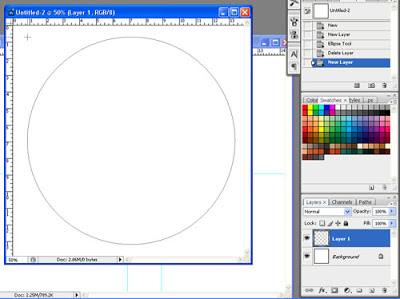
Create a perfectly circular selection with a diameter of 220 pixels and position it at the exact center of your canvas. The easiest way to do this is to select the “Elliptical Marquee Tool” from the tool bar, then on the tool options (on the top of the screen) set the “Style” to “Fixed Size” and enter “220 px” for both the height and the width.
Then (with the “Elliptical Marquee Tool” still the active tool, left click on anywhere on your canvas to produce the selection.
With the “Elliptical Marquee Tool” still active, hover your mouse pointer over the selection (inside the selection) and click on (and hold) and drag the selection until its center “snaps” to the intersection of the two guides you have created earlier.

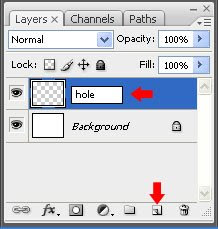
Step 5
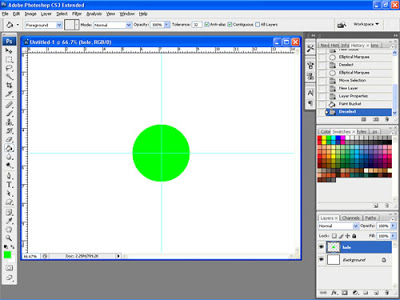
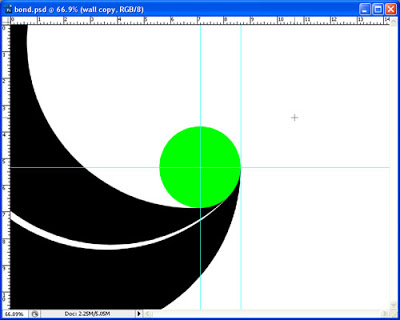
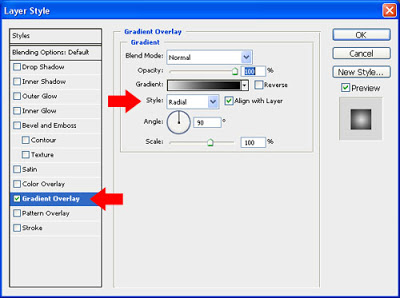
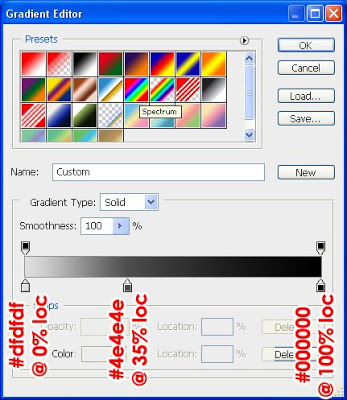
Create a new layer, name it “hole” and (with the “hole” layer the active layer) fill the selection with any color (in this case I used green). It doesn’t matter what color you use as we will be modifying this later. For now, this will serve as our guide. Deselect the selection after you have filled it by pressing “Ctrl+D”.
Step 6
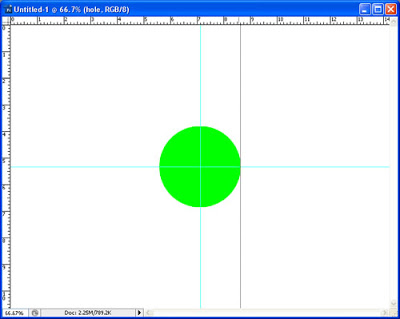
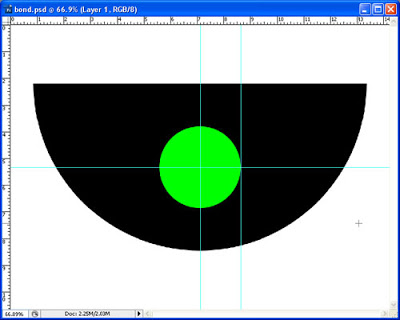
With the “hole” layer still the active layer, drag a vertical guide and let it snap to the right edge of the circle you’ve just created. To do this, hover your mouse pointer over the vertical ruler at the left side of your canvas and click (and hold) on it and drag your mouse pointer to the right. If you don’t see any rulers, just press “Ctrl+R” to make them appear.
Save your work as “bond.psd”.
Step 7
We will forget about what we’ve just done so far and we will work on something on a new canvas. But, do not close your work as we will go back to that later.
Now, create a new 72 dpi-document sized 1000 pixels wide by 1000 pixels tall

Step 8
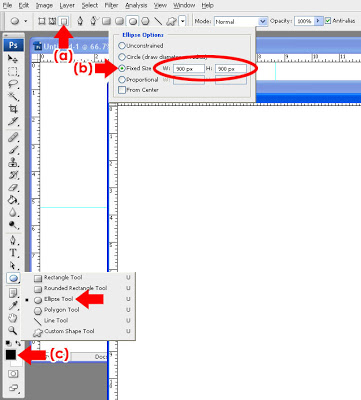
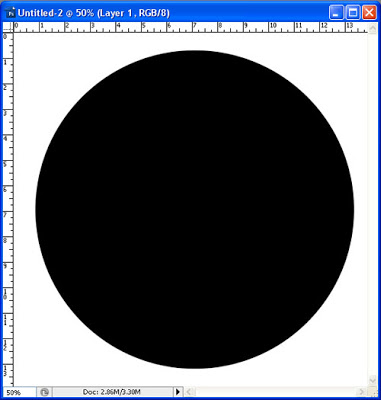
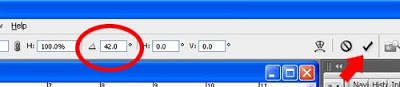
With the “Ellipse Tool” selected, set it to “Fill pixels” (a) and “Fixed Size” (b) and enter “900 px” for both the height and width.
Also, set your foreground color to “black” (c).
Step 9
Create a new layer (you need not name this anymore since we will just use it to produce something which we will eventually move to the other canvas) and click and HOLD down your left mouse button on anywhere on your (new) canvas.
While still holding your left mouse button down, drag/move the circle’s outline until you can see a complete circle on your canvas.
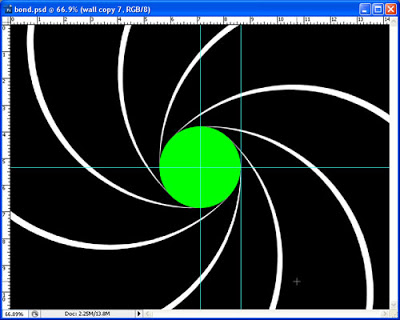
RELEASE THE MOUSE BUTTON ONLY WHEN YOU SEE A COMPLETE CIRCLE ON YOUR CANVAS. (Note: We NEED to produce a perfect circle for this. If some part of your circle falls off to any of the edges of your canvas, your circle will not be rendered completely.) You should now have something like this:
Step 10
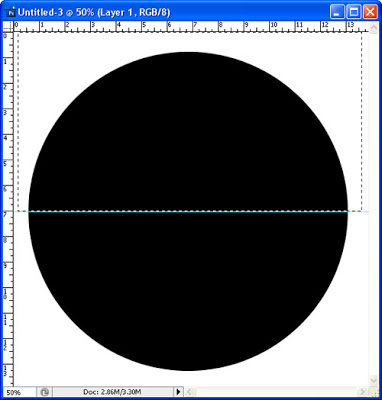
With the layer on which you created the black circle still the active layer, Drag a horizontal guide and let it snap to the horizontal center of the black circle you’ve just created.

I am very sure that most of you (if not all) are very familiar with James Bond films. This tutorial will guide you through the basic steps in creating the gun barrel thing that you see in the introduction of James Bond films. Take note, I said “basic”. I’ll leave it all up to you to add effects to this to make it more realistic-looking if it’s that you desire.
I was right with what I said in my “Camera iris diaphragm tutorial” that it can be modified to create this kind of effect. (smile)
Have fun!
Step 1
Create a new 72 dpi-document sized 1024 pixels wide by 768 pixels tall
Step 2
Put a vertical guide at 512 pixels and a horizontal guide at 384 pixels. To do this, go to the “View” menu and click on “New guide” (you have to do this twice, one for the vertical guide and one for the horizontal guide). This should create guides that intersect at the exact center of your canvas.
Step 3
Make sure you’ve got “Snap To Guides” turned on. If you haven’t, go to the “View” menu, then “Snap To” and click on “Guides”.
(Note: A check mark beside “Guides” indicates that you already have “Snap To Guides” turned on.)
Step 4
Create a perfectly circular selection with a diameter of 220 pixels and position it at the exact center of your canvas. The easiest way to do this is to select the “Elliptical Marquee Tool” from the tool bar, then on the tool options (on the top of the screen) set the “Style” to “Fixed Size” and enter “220 px” for both the height and the width.
Then (with the “Elliptical Marquee Tool” still the active tool, left click on anywhere on your canvas to produce the selection.
With the “Elliptical Marquee Tool” still active, hover your mouse pointer over the selection (inside the selection) and click on (and hold) and drag the selection until its center “snaps” to the intersection of the two guides you have created earlier.
Step 5
Create a new layer, name it “hole” and (with the “hole” layer the active layer) fill the selection with any color (in this case I used green). It doesn’t matter what color you use as we will be modifying this later. For now, this will serve as our guide. Deselect the selection after you have filled it by pressing “Ctrl+D”.
Step 6
With the “hole” layer still the active layer, drag a vertical guide and let it snap to the right edge of the circle you’ve just created. To do this, hover your mouse pointer over the vertical ruler at the left side of your canvas and click (and hold) on it and drag your mouse pointer to the right. If you don’t see any rulers, just press “Ctrl+R” to make them appear.
Save your work as “bond.psd”.
Step 7
We will forget about what we’ve just done so far and we will work on something on a new canvas. But, do not close your work as we will go back to that later.
Now, create a new 72 dpi-document sized 1000 pixels wide by 1000 pixels tall
Step 8
With the “Ellipse Tool” selected, set it to “Fill pixels” (a) and “Fixed Size” (b) and enter “900 px” for both the height and width.
Also, set your foreground color to “black” (c).
Step 9
Create a new layer (you need not name this anymore since we will just use it to produce something which we will eventually move to the other canvas) and click and HOLD down your left mouse button on anywhere on your (new) canvas.
While still holding your left mouse button down, drag/move the circle’s outline until you can see a complete circle on your canvas.
RELEASE THE MOUSE BUTTON ONLY WHEN YOU SEE A COMPLETE CIRCLE ON YOUR CANVAS. (Note: We NEED to produce a perfect circle for this. If some part of your circle falls off to any of the edges of your canvas, your circle will not be rendered completely.) You should now have something like this:
Step 10
With the layer on which you created the black circle still the active layer, Drag a horizontal guide and let it snap to the horizontal center of the black circle you’ve just created.


")
